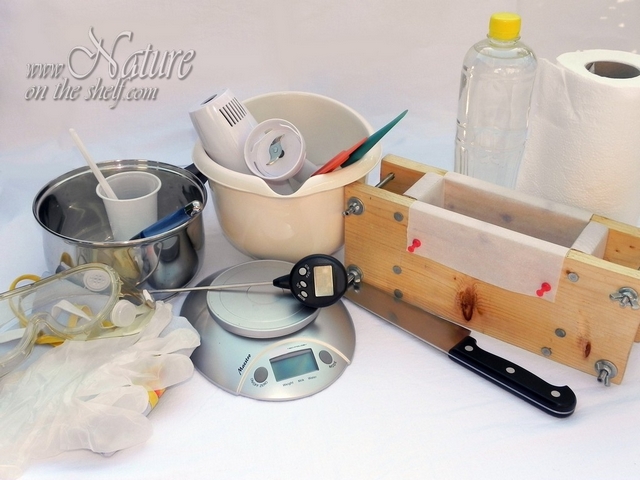
Basic soap making equipment
Handmade soap making does not require investment in any special equipment. Most, if not all, of the needed items already exist in every kitchen.
Due to the corrosive nature of lye solution, it is important to know which materials are safe to use in soap making and which ones should be avoided. Soap making equipment and utensils safe for use should be made of stainless steel, sturdy plastic (PP#5), glass, Pyrex and rubber or silicone. Utensils and vessels made of or coated with Teflon, aluminum, copper and their alloys, iron, tin and plastic foams should never be used in soap making because these materials react with lye and create toxic compounds which end up in soap.
Before you start making soap it is highly recommended to prepare all the necessary equipment to be close at hand. Depending on the soap-making technique, equipment requirements will vary.
This is a list of tools, utensils and equipment items which are necessary or may show quite useful in soap making. Some of them are basic and absolutely necessary, and it would be difficult to make soap without them. On the other hand, some of them are not necessary, but could ’add value’ to soap making.
Safety kit: rubber or latex gloves, protective goggles, long sleeve shirt and leg-covering clothes (trousers), apron;
- Lye is a seriously corrosive chemical and it can burn skin and cause serious injuries resulting in wounds and scars. To your eyes, lye can cause permanent damage with a high risk of blindness. Soap-making temperatures are often similar to body temperature, so if drops of lye or raw soap splash your skin, there is a big chance they remain undetected until they start to tingle. Therefore, your skin should be covered as much as possible.
- Accordingly, you should work with lye and raw soap batter very carefully to prevent any splashing.
- Goggles, gloves and protective wear must be used from the very beginning up to the very end of the soap-making process, including the cleaning of dirty dishes.

- An accurate digital scale
- Soap making requires very accurate measurement by weight (not by volume!), so your scale should have a maximum variance of 1 gram (or 0.01 oz). Accurate measurement is the most important step in soap making, and this is one of the few steps where neither compromise nor improvisation represents a good option.
- Thermometer
- The best option is a quick-read digital kitchen thermometer with stainless steel tip or an infrared thermometer. Both are quite precise and quickly display results. Temperature control of lye and oils is very important to avoid misbehavior of soap batter.
- Basically, a thermometer is not necessary because experienced soap makers can estimate temperature by hand, touching the outside of the soap container. On the other hand, beginners find a thermometer very helpful as they have no experience yet.

- Microwave oven or stove serves for melting butters and heating oils;
- Plastic cup for weighing of sodium hydroxide flakes/beads;
- A simple disposable plastic cup is good enough for this. After use, this cup will be contaminated by sodium hydroxide beads or dust, so it should not be used for other purposes without thorough cleaning. The easiest way is to use that cup only for sodium hydroxide measuring and to store it at a safe place together with a box of dry sodium hydroxide. A cheap, disposable plastic spoon to scoop dry sodium hydroxide from its container is a desirable addition.

- Stainless steel container for dissolving lye;
- For safety reasons, this container should have a capacity at least 3-4 times larger than needed for water plus sodium hydroxide to dissolve in it. Sodium hydroxide will dissolve in water, which is an extremely exothermic reaction. It will easily heat the solution up to 80-90oC. On a large scale, this can generate so much heat to cause the water to boil. For this reason, water should be cool.
- Stainless steel spoon or spatula is necessary to stir the solution while sodium hydroxide is dissolving;
- A sturdy plastic spoon can be an option, but there is a risk of the heat to melt plastic. The best option is a stainless steel spoon with a heat protective handle.

- Container for heating oils and fats
- This container should be made of plastic, pyrex or stainless steel, depending on the method for melting and heating of fats – microwave oven or stove; the most practical method for small batches of soap is to melt/heat fats in PP#5 (polypropylene#5) plastic or stainless steel mixing bowl and to use it later for mixing fats with lye.
- Soap pot
- This container serves for mixing fats with lye and serves for the main part of saponification to take place. It must be lye-resistant, so it should be of stainless steel or PP#5 plastic. This container should be deep enough to enable safe mixing of soap batter without splashing around. It should not be too large or too wide – soap batter should have enough depth so as to prevent air to be mixed into soap with the help of an immersion blender.
- Long handle spatula
- A spatula is used to carefully combine lye with oils and additives with soap, as well as to scrape soap batter off the container to the mold. This spatula is one of the soap maker's best friend. A long handle silicone spatula is a good choice.

- Stick (immersion) blender
- A stick blender is not necessarily a part of the soap making equipment, but it is so helpful that almost all soap makers use it. Saponification occurs during a long-time period of mixing oils and lye. When hand mixing, it often takes a few hours. The stick blender will accomplish this within a few minutes.

- Paper towels
- A jumbo-size roll of paper towels serves to wipe away any splashes of lye or raw soap from the work surface. Each drop of lye or raw soap on the tabletop is a potential risk of skin burns so it has to be removed immediately.
- Vinegar
- A bottle of white vinegar should always be at hand. If lye or raw soap spill on the countertop, it should be wiped off with a paper towel and then poured over by vinegar to neutralize any excess sodium hydroxide left.

- Double boiler or crock pot
- A double boiler is necessary in hot process soap making.
- Soap mold
- Almost any box of an appropriate size can serve as a soap mold – plastic storage box, milk box, shoe box, as well as a wooden, plastic, acrylic or silicone soap mold.
- Soap cutter
- If soap is molded in a large mold, it has to be cut when it becomes firm, similarly to hard cheese. This usually happens within 12-24 hours after pouring. There are many tools which can serve for cutting of soap: a large kitchen knife, wire cake cutter, guitar string, fishing line, pastry scraper/cutter or professional single-bar or multi-bar soap cutter.
